One of the things I like about Linux (aside from it being free), is that you can deploy a website using SSH rather than FTP. This is more secure because SSH uses encryption and a single port. In this post, I will show you how to deploy an ASP.NET Core website using Git and a Post Receive hook.
Introduction
Wouldn’t it be good if you could publish an ASP.NET Core website to a Linux server from the command line with something like this.
git push release master
This is how I publish the blog engine that runs this site. Read on to find out how this can be achieved with Ubuntu in 7 simple steps.
Step 1: Download the ASP.NET Core Samples to your Local Machine
First of all make sure you have Git installed on your local machine. Open Git language-Bash (or terminal for UNIX systems) and then run the following command to download the samples.
git clone https://github.com/aspnet/cli-samples
We will use the HelloMvc sample to demonstrate pushing an ASP.NET Core site to the remote server. We will also configure a post receive hook so that the site will be published to an output directory on the server (/srv/aspnet/hellomvc.com).
Step 2: Add Remote to the Local Repository
Next we need to add our remote server to the local repository. For this tutorial I will assume the IP address of your remote server is 192.168.1.201. Replace this with your own server IP. Run the following command to add the new remote to the local repository.
cd cli-samples
git remote add release [email protected]:hellomvc.git
Replace 192.168.1.201 with the IP address of your remote server.
Note: We used git as the user and hellomvc as the repository name. We will configure these on the remote server in the following steps.
Step 3: Create a Git user on the remote Linux server
From your local machine, run the following command with Git language-Bash (or terminal on UNIX based systems).
ssh [email protected]
Replace youradminuser with your username and 192.168.1.201 with the IP address of the remote machine.
You should now be connected to your remote server.
Next, create a user called git and assign a password.
sudo useradd -m git -s /usr/bin/git-shell
sudo passwd git
Note: Notice we specified the -s /usr/bin/git-shell for the shell. This prevents the Git user from logging onto the system.
Before we move onto the next step, we need to modify the sudoers file so that the git user can run the publish command.
Run the following command:
sudo visudo
Add the following line to the file and then save it.
git ALL=(ALL) NOPASSWD: /usr/bin/dotnet
Step 4: Configure the output directory of where the site will run from
Just pushing the files to the server with git is not enough. We need to build the ASP.NET Core project and then publish the files to a secure location on the server where the .NET Core application can run.
Run the following commands to create the output folder.
sudo mkdir -p /srv/aspnet
sudo chown -R :www-data /srv/aspnet
sudo chmod -R g+s /srv/aspnet
Step 5: Create a bare Git repository on the Linux server
If Git is not installed on your server, run the following command.
sudo apt-get install git
Change to the git user home directory.
cd /home/git
Create the git repository.
sudo mkdir hellomvc.git
cd hellomvc.git
sudo git init --bare
The --bare flag means no working copy will be located here. The working copy will be downloaded to the /tmp folder in the post-receive hook which we will create in the next step.
Step 6: Create a Post Receive Hook
In this step, we will create a script that is run whenever we push any changes to the Git repository. The script will checkout a working copy to the /tmp folder, restore the NuGet packages, build the ASP.NET Core site, and then publish the output to the directory we created in step 4.
cd hooks
sudo vim post-receive
Add the following contents to the file.
#!/bin/sh

if [ ! -e /tmp/hellomvc.com ]; then
  mkdir /tmp/hellomvc.com
fi

git --work-tree=/tmp/hellomvc.com --git-dir=/home/git/hellomvc.git checkout -f
cd /tmp/hellomvc.com/HelloMvc
dotnet restore
dotnet build -c Release
sudo dotnet publish -c Release -o /srv/aspnet/hellomvc.com
Note: sudo is required for permission to write to the /srv/aspnet directory.
Make the file executable.
sudo chmod +x post-receive
Change the owner and group of all files inside the git repository to git.
sudo chown -R git:git /home/git
Step 7: Test publish
The final step is to publish the local repository to the remote server using the following command:
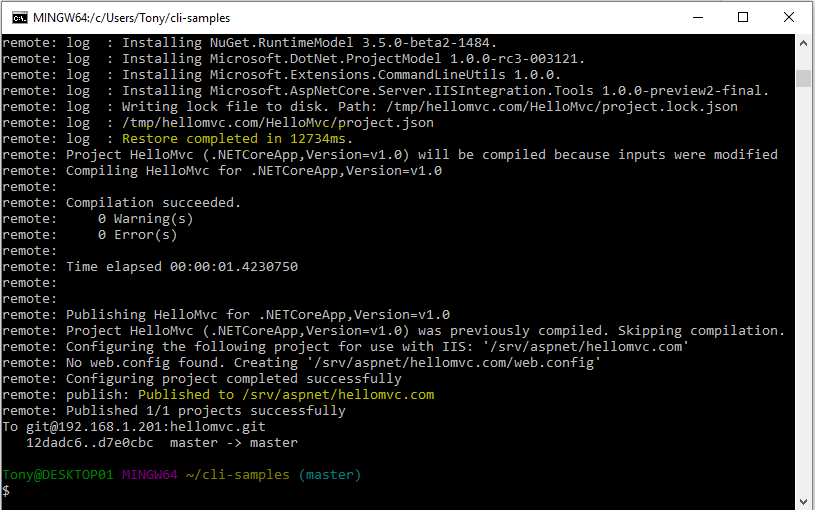
git push release master
If everything worked OK you should see an output like this.

Final Thoughts
In this post I showed you how to setup Git to push a local ASP.NET Core site to a remote Ubuntu 14.04 server. We also configured a Git hook so that the project would be built and published to a suitable location on the server where it can be run from.
I didn’t explain how to run the published site because I have already discussed this in a previous post. Read it here: How to Run an ASP.NET Core Website in Production on Ubuntu Linux
If you have any questions or you’ve spotted any mistakes please leave them in the comments below.