With the release of .NET Core and ASP.NET Core it’s now possible to run modern web applications written in C# on Linux. In this post, I will show you how to configure a Ubuntu server to run an ASP.NET Core site in production.
This post will cover:
- What is ASP.NET Core?
- How to install .NET Core on Ubuntu.
- Running an ASP.NET Core website on Ubuntu.
- Configure NGINX as a Reverse Proxy to ASP.NET Core.
- Configure ASP.NET Core as a Background Service.
What is ASP.NET Core?
ASP.NET Core is a rewrite of ASP.NET and now runs on multiple operating systems such as Windows, OS X, Linux etc. Here is an excerpt of how the ASP.NET team describe it.
ASP.NET Core is a new open-source and cross-platform framework for building modern cloud based internet connected applications, such as web apps, IoT apps and mobile backends. ASP.NET Core apps can run on .NET Core or on the full .NET Framework. – Introduction to ASP.NET Core
I think it goes without saying the benefits this brings to the whole development community. Businesses that use Windows can save costs on server licenses by running their apps on Linux.
How to Install .NET Core on Ubuntu
In order to run ASP.NET Core on Linux we need to install .NET Core. Follow the steps below to install .NET Core on your required Ubuntu version.
Install ASP.NET Core on Ubuntu 14.04
sudo sh -c 'echo "deb [arch=amd64] https://apt-mo.trafficmanager.net/repos/dotnet/ trusty main" > /etc/apt/sources.list.d/dotnetdev.list'
sudo apt-key adv --keyserver apt-mo.trafficmanager.net --recv-keys 417A0893
sudo apt-get update
sudo apt-get install dotnet-dev-1.0.0-preview2-003121
Install ASP.NET Core on Ubuntu 16.04
sudo sh -c 'echo "deb [arch=amd64] https://apt-mo.trafficmanager.net/repos/dotnet/ xenial main" > /etc/apt/sources.list.d/dotnetdev.list'
sudo apt-key adv --keyserver apt-mo.trafficmanager.net --recv-keys 417A0893
sudo apt-get update
sudo apt-get install dotnet-dev-1.0.0-preview2-003121
Running an ASP.NET Core Website on Ubuntu
The first step is to prepare the output directory that our test project will be published to.
sudo mkdir -p /srv/aspnet/hellomvc.com
sudo chown -R :www-data /srv/aspnet
sudo chmod -R g+s /srv/aspnet
The first command creates the directory, the second command changes the group to www-data and the last command makes sure that new files and folders inside the directory will be assigned the www-data group on creation. The reason we assign www-data to the directory is because it is safer to run the app as the www-data user.
Next we will download the samples from the ASP.NET GitHub repository and then publish the sample application to our output directory.
git clone https://github.com/aspnet/cli-samples /tmp/samples
cd /tmp/samples/HelloMvc
dotnet restore
sudo dotnet publish -c Release -o /srv/aspnet/hellomvc.com
Test running the application as the www-data user with the following command:
sudo -u www-data bash -c "dotnet /srv/aspnet/hellomvc.com/HelloMvc.dll"
You should see the output
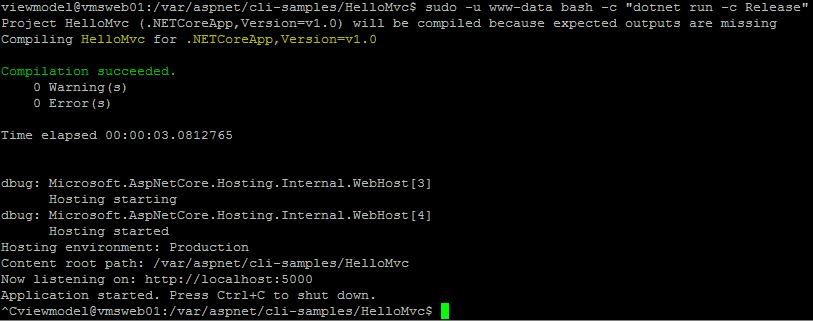
Press Ctrl+C to shutdown the application.
Configure NGINX as a Reverse Proxy to ASP.NET Core
As you may have noticed when we tested the ASP.NET Core app in the previous section, the port it was listening on was 5000. We could change the app to listen on port 80 but that would mean no other sites on the server would be able to run at the same time. It’s also not recommended by Microsoft to run Kestrel (the ASP.NET Core module that handles HTTP requests) without a proxy.
To get around this we need to configure NGINX to listen on port 80 and proxy the requests to our ASP.NET Core app.
First we need to install NGINX with the following command.
sudo apt-get install nginx
Now we need to create the virtual host config for our test app by creating a new file called hellomvc.com.conf in the /etc/nginx/sites-available directory.
sudo vim /etc/nginx/sites-available/hellomvc.com.conf
Add the following configuration options to the file.
server {
    listen 80;
    server_name hellomvc.com;

    location / {
        proxy_pass http://127.0.0.1:5000;
        proxy_http_version 1.1;
        proxy_set_header Upgrade $http_upgrade;
        proxy_set_header Connection keep-alive;
        proxy_set_header Host $host;
        proxy_cache_bypass $http_upgrade;
    }
}
Activate the new virtual host.
sudo ln -s /etc/nginx/sites-available/hellomvc.com.conf /etc/nginx/sites-enabled/
Apply the configuration.
sudo nginx -s reload
After running the command we used above to start the app again, you should be able to access the site at http://hellomvc.com.
However, manually starting the process in production is not desirable, so we will configure the app to run as a background service in the next step.
Configure ASP.NET Core as a Background Service
Supervisor is a third-party program that can be used to monitor a process on Linux. By installing and configuring Supervisor we can monitor the ASP.NET Core process, so that it starts with the operating system and restarts in the event of a failure.
Install Supervisor with the following command.
sudo apt-get install supervisor
The permissions of the supervisor.sock file need changed so that programs can be restarted without using sudo. Edit the supervisord.conf file.
sudo vim /etc/supervisor/supervisord.conf
Change chmod from 700 to 766.
[unix_http_server]
file=/var/run/supervisor.sock   ; (the path to the socket file)
chmod=0766                      ; socket file mode (default 0700)
Start Supervisor.
sudo service supervisor start
Configure Supervisor to monitor our ASP.NET Core app
sudo vim /etc/supervisor/conf.d/aspnet.conf
Add contents and save.
[group:hellomvc]
programs=hellomvcapp

[program:hellomvcapp]
directory=/srv/aspnet/hellomvc.com
command=/usr/bin/dotnet HelloMvc.dll
autostart=true
autorestart=true
stderr_logfile=/var/log/hellomvc.err.log
stdout_logfile=/var/log/hellomvc.out.log
user=www-data
stopsignal=INT
stopasgroup=true
Restart Supervisor to apply the changes.
sudo service supervisor restart
The application can now be started with.
supervisorctl start hellomvc:
You should be able to view the site by browsing to: http://hellomvc.com. Note: You will need to add hellomvc.com to your DNS server or hosts file to test the app.
If you are using Windows I have created handy tool that makes editing the hosts file easy. You can download it from GitHub here or read more about it in this post: Announcing Hosts Editor, a FREE tool for editing the Windows hosts file.
You can check for startup errors at /var/log/hellomvc.err.log and runtime logging at /var/log/hellomvc.out.log.
Final Thoughts
After following the steps in this post, you should now be able to configure Ubuntu server to host your ASP.NET Core websites. I’m using a similar setup to run this website and I’m finding it fast and deploying to it is easy with Git.
Updates
– 28 June 2016 – Changed to ASP.NET Core 1.0
– 15 June 2016 – Changed to ASP.NET Core RC2 (.NET Core)
– 12 Mar 2016 – ASP.NET Core RC1 (DNX)